A wobbly toilet seat is a common household issue that can quickly become a nuisance. Whether the seat slides from side to side or lifts when you sit down, this problem is often simple to fix with the right tools and a bit of know-how. In this comprehensive guide, we walk you through how to fix a wobbly toilet seat with professional-level precision.
Tools and Materials Needed for Fixing a Loose Toilet Seat
Before starting, gather the following items:
Flathead screwdriver
Phillips head screwdriver
Adjustable wrench or pliers
Toilet seat tightening kit (optional)
New toilet seat bolts (if replacements are needed)
Penetrating oil (for rusted bolts)
Step 1: Inspect the Toilet Seat for Damage
Before tightening anything, examine the seat and hinges for any visible signs of cracking, warping, or structural damage. A damaged toilet seat should be replaced rather than repaired. Check both the seat and the lid, as well as the hinge mechanism where it connects to the bowl.
Step 2: Locate the Seat Bolts
Most toilet seats are attached with two bolts located at the back, where the seat connects to the bowl. These bolts are typically hidden under plastic caps.
Use your fingers or a flathead screwdriver to gently pop open the bolt covers.
Examine the bolts and nuts underneath to determine whether they’re loose, rusted, or stripped.
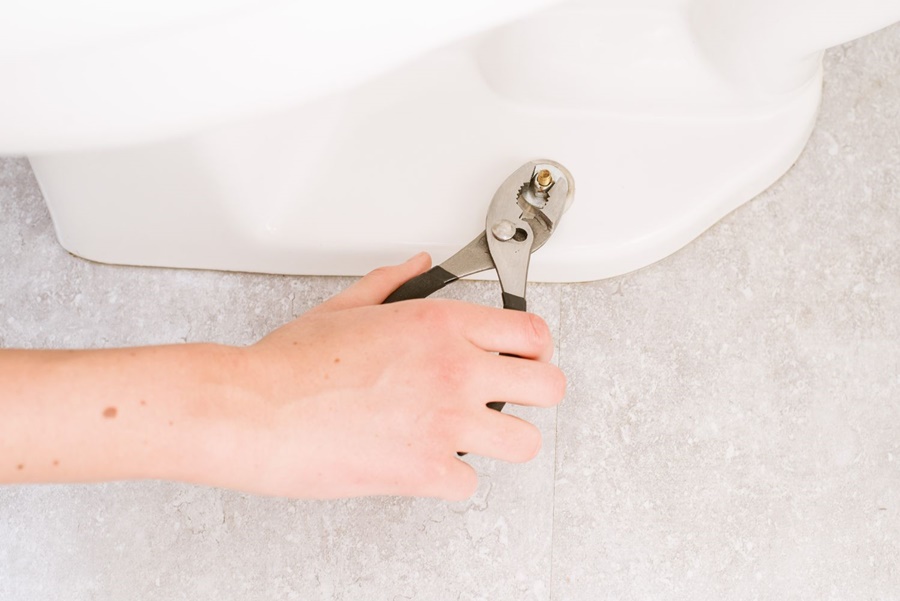
Step 3: Tighten the Seat Bolts
If the bolts are loose:
1. Use a screwdriver on the top side of the bolt.
2. Simultaneously, use a wrench or pliers underneath the toilet bowl to hold the nut in place.
3. Turn the screwdriver clockwise to tighten the bolt.
4. Don’t overtighten, as plastic bolts can crack and damage the porcelain.
Test the seat after tightening to see if it still wobbles. If it’s still unstable, proceed to the next step.
Step 4: Replace Stripped or Rusted Bolts
If the bolts spin without tightening or show signs of rust:
Spray a small amount of penetrating oil and wait 10–15 minutes.
Carefully remove the bolts using pliers and a screwdriver.
If bolts are stripped, they’ll need to be replaced.
Purchase a universal toilet seat bolt kit, readily available at hardware stores.
Install the new bolts, align the seat correctly, and tighten them securely.
Step 5: Consider Using Rubber Washers or Stabilizers
Sometimes even new bolts don’t solve the wobble. In such cases, rubber washers or seat stabilizers can help.
Insert rubber washers between the toilet bowl and bolt heads to add friction and stability.
Some hardware kits include toilet seat stabilizers that anchor the seat more securely.
This method is especially useful for porcelain bowls with slight imperfections around the bolt holes.
Step 6: Upgrade to Top-Fixing Hinges (If Applicable)
For toilets where access to the underside is limited (e.g., concealed or wall-mounted toilets), consider top-fixing toilet seats.
These seats use expansion plugs or toggle bolts that secure from above.
Installation is simpler and avoids the hassle of reaching under the bowl.
If your toilet supports it, upgrading to a top-fix model can resolve persistent instability issues.
Step 7: Align the Seat Correctly Before Final Tightening
One overlooked cause of a wobbly toilet seat is misalignment. Always make sure:
The seat is centered over the bowl.
The lid and seat align perfectly with the rim.
The bolts are inserted through the correct holes and tightened symmetrically.
Misaligned seats often wobble even if the bolts are fully tight. Adjust as needed before applying final torque.
Step 8: Add Thread Locking Compound (Optional)
For a long-lasting fix, you can apply thread-locking compound (like Loctite) to the bolt threads.
Apply a small amount before tightening the nuts.
It helps prevent bolts from loosening due to seat movement over time.
Be sure the compound used is removable, in case you need to replace the seat in the future.
Step 9: Install a New Toilet Seat if Needed
If the seat or hinges are beyond repair, it’s best to install a new, high-quality toilet seat.
When selecting a new one, consider:
Material (plastic, wood, or cushioned vinyl)
Mounting style (standard vs. top-fix)
Shape compatibility (round or elongated)
A good seat with sturdy hardware will minimize future wobbling.
Maintenance Tips to Prevent a Wobbly Toilet Seat
To keep your toilet seat stable for years to come:
Check the bolts every 3–6 months for signs of loosening.
Wipe down the hinge area regularly to prevent moisture buildup and corrosion.
Avoid standing or leaning heavily on the seat lid.
Common Mistakes to Avoid When Fixing a Loose Toilet Seat
Overtightening plastic bolts, which can crack or strip.
Using metal bolts without washers, which may damage porcelain.
Ignoring seat misalignment before tightening.
Not checking underside nuts during tightening.
Avoiding these errors ensures a secure and professional repair that lasts.
Conclusion
Fixing a wobbly toilet seat is a straightforward task with the right approach. Whether you're tightening bolts, replacing worn hardware, or installing a brand-new seat, following these steps ensures a stable, secure, and comfortable toilet experience. Routine maintenance will keep everything in place and extend the life of your seat.