Adjusting the water level in your toilet bowl is an essential part of home maintenance. Whether you’re dealing with a toilet bowl that is constantly overfilling or one that doesn’t have enough water, it's crucial to ensure the right water level for efficient flushing and preventing unnecessary water wastage. A proper water level can also prevent issues like clogs, weak flushes, and higher water bills. In this guide, we will walk you through the process of adjusting the water level in the toilet bowl, providing you with all the details you need to resolve this issue.
Why Adjusting the Water Level Matters
Before we dive into the how-to guide, it’s important to understand why adjusting the water level in your toilet bowl is necessary. The water level impacts both the functionality and efficiency of your toilet. An incorrect water level can lead to:
Inefficient flushing: If the water level is too low, the toilet may not flush properly, causing waste to remain in the bowl.
Overflows and leaks: If the water level is too high, the toilet may overflow, leading to leaks and water damage.
Increased water bills: A toilet that is constantly overfilling wastes water, which can increase your water bills significantly.
Now that we understand why it is important to get the water level just right, let’s look at the steps involved in adjusting it.
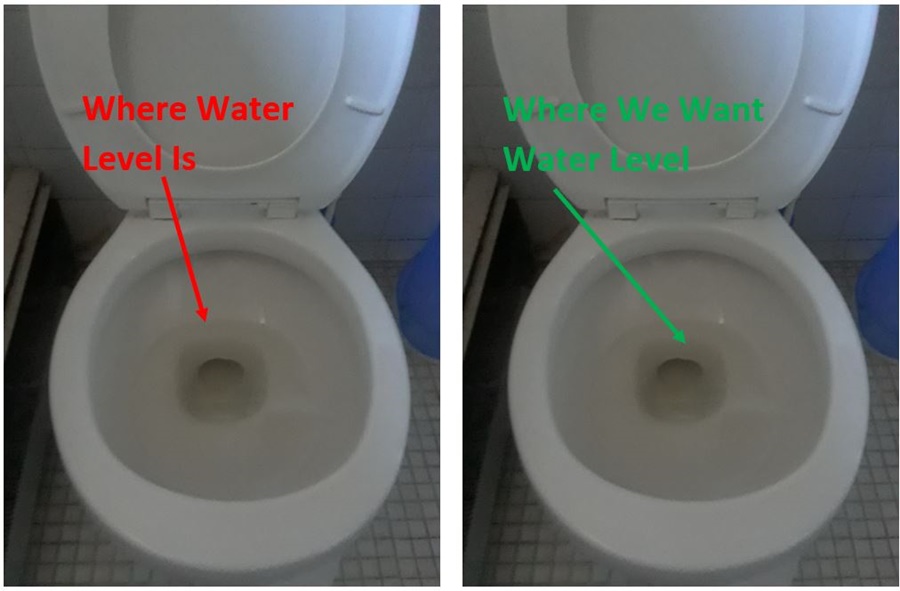
How to Check and Adjust Water Level in Toilet Bowl
Adjusting the water level in your toilet is a relatively simple process. Here’s a step-by-step guide to help you through it.
Step 1: Identify the Water Level in the Toilet Tank
The first thing to do when adjusting the water level in the toilet bowl is to check the water level inside the toilet tank. The tank is where the water is stored before it enters the bowl during a flush.
1. Remove the Tank Lid: Gently remove the lid from the toilet tank to expose the internal components.
2. Locate the Water Line: Most toilet tanks have a water line indicator on the inside of the tank. This line is usually a marking that shows where the water should be. The ideal water level should be approximately 1 inch below the top of the overflow tube.
If the water level is too low or too high compared to this marker, you will need to adjust the fill valve.
Step 2: Locate the Fill Valve and Float Mechanism
The fill valve controls how much water enters the tank after a flush. The float mechanism within the fill valve determines the water level by shutting off the valve once the correct level is reached.
1. Find the Fill Valve: The fill valve is located on the side of the toilet tank and is connected to the water supply pipe.
2. Inspect the Float Mechanism: The float is typically a ball, a cup, or a rod connected to the valve. This float rises with the water level and activates the valve to shut off the flow once the correct level is reached.
Step 3: Adjust the Water Level
There are a few different types of fill valve mechanisms, each requiring a slightly different adjustment method. The most common fill valve types include:
Ballcock Fill Valve (Ball Float): This is an older system where a ball-shaped float is attached to a long arm. As the water level rises, the float rises with it and shuts off the valve when it reaches a certain height.
Cylinder Fill Valve (Float Cup): This newer system uses a cup-shaped float that moves up and down along the fill valve. The float rises with the water level and cuts off the water when the desired level is reached.
Adjusting a Ballcock Fill Valve
1. Locate the Adjustment Screw: If you have a ballcock valve, you will find an adjustment screw near the float arm.
2. Adjust the Float Arm: To lower the water level, turn the adjustment screw counterclockwise. To raise the water level, turn the screw clockwise.
3. Check the Water Level: After adjusting, flush the toilet to see if the water level has reached the correct height. You may need to make further adjustments if necessary.
Adjusting a Cylinder Fill Valve (Float Cup)
1. Adjust the Float: On a cylinder fill valve, you’ll likely find a clip or screw mechanism to adjust the float cup. To lower the water level, move the float cup down the valve shaft. To raise the water level, move the float cup upward.
2. Test the Adjustment: Once you’ve adjusted the float cup, flush the toilet to verify that the water level in the tank and bowl is correct.
Step 4: Test the Toilet’s Functionality
After making adjustments, always test the toilet by flushing it a couple of times. Ensure that:
The toilet flushes properly, with enough water entering the bowl to clear waste.
The water level in the bowl remains consistent and doesn’t fluctuate.
There are no leaks or overflows from the tank.
If you notice any issues, repeat the steps above to fine-tune the water level further.
Step 5: Check for Other Issues
If adjusting the water level doesn’t resolve the issue, there could be other underlying problems. For example, the flush valve, gasket, or overflow tube might be faulty. In such cases, you may need to replace certain components or call a professional plumber for further assistance.
Common Problems and How to Fix Them
Sometimes, adjusting the water level isn’t enough to resolve issues. Here are some common toilet water problems and how to fix them:
1. Water Continues to Run After a Flush
If the water keeps running after the flush, it might indicate that the flapper valve is not closing properly. This could cause water to continuously flow into the tank, resulting in a higher-than-normal water level.
Fix: Inspect the flapper valve and ensure it is sitting correctly on the flush valve seat. If damaged, replace the flapper.
2. Toilet Overflows
If the water level in the toilet bowl is too high, it could overflow during a flush. This can be caused by a clog or an improperly adjusted fill valve.
Fix: Clear any clogs in the toilet bowl or drain. Adjust the fill valve as described above to ensure the water level is at the correct height.
3. Weak Flushing
If the water level in the toilet tank is too low, the toilet may not have enough water to perform a strong flush.
Fix: Increase the water level in the tank as described earlier. This will ensure the toilet has enough water to flush effectively.
Conclusion
Adjusting the water level in your toilet bowl is a simple yet essential task to maintain a fully functioning toilet. By following the steps outlined in this guide, you can easily adjust the water level and ensure your toilet operates efficiently. Whether you're dealing with a constantly running toilet, a weak flush, or water wastage, understanding how to adjust the water level can save you both time and money on repairs and water bills.