Installing a raised toilet seat can greatly enhance bathroom safety and accessibility, especially for seniors, individuals recovering from surgery, or anyone with limited mobility. In this comprehensive guide, we detail exactly how to install a raised toilet seat, from selecting the right model to securing it properly. Our in-depth walkthrough ensures ease of installation and optimal use.
Understanding the Purpose of a Raised Toilet Seat
A raised toilet seat increases the height of the toilet bowl, making it easier for individuals to sit down and stand up without straining their knees, hips, or back. These devices are particularly beneficial for people with arthritis, mobility impairments, or recent surgeries, such as hip replacements.
Types of Raised Toilet Seats and How to Choose One
Before installation, it’s essential to understand the different types of raised toilet seats available. Selecting the right type ensures not only comfort but also compatibility with your existing toilet.
1. Clamp-On Raised Toilet Seats
Installation: No tools required; clamps directly onto the existing toilet bowl.
Ideal for: Temporary use or travel.
Pros: Easy to install and remove.
Cons: May shift if not secured tightly.
2. Bolt-On Raised Toilet Seats
Installation: Requires removal of the current toilet seat; bolts directly to the toilet bowl.
Ideal for: Permanent or long-term use.
Pros: More stable and secure.
Cons: Slightly more complex to install.
3. Hinged Raised Toilet Seats
Installation: Bolted on, but includes a hinge for easier cleaning.
Ideal for: Regular users who need a permanent solution.
Pros: Combines security and functionality.
Cons: Slightly more expensive.
4. Raised Toilet Seats with Arms
Installation: Available in both clamp-on and bolt-on styles.
Ideal for: Users needing extra support.
Pros: Provides added stability when sitting and standing.
Cons: Bulkier design.
Tools and Materials Needed
Depending on the type of seat you’re installing, you may need the following tools:
Adjustable wrench
Flathead screwdriver
Disinfectant cleaner
Clean rag or towel
New toilet seat bolts (if not included)
Raised toilet seat of your choice
Pre-Installation Checklist
Before you begin the installation process, follow these steps:
Measure the height required by the user (typically 2 to 6 inches of elevation).
Check toilet shape – determine if your toilet is round or elongated.
Clean the existing toilet bowl thoroughly to ensure proper fitting and hygiene.
Inspect the product for all necessary components, including bolts, washers, and arms if applicable.
Step-by-Step Instructions to Install a Raised Toilet Seat
Step 1: Remove the Existing Toilet Seat (for Bolt-On Models)
Using a screwdriver and wrench, loosen and remove the nuts securing the current toilet seat.
Lift the old seat off and set it aside.
Wipe the surface clean and dry.
Step 2: Align the Raised Toilet Seat with the Bowl
Position the new raised seat over the toilet bowl:
For clamp-on models, center the seat and tighten the side clamps evenly until snug.
For bolt-on models, align the holes on the raised seat with those on the toilet.
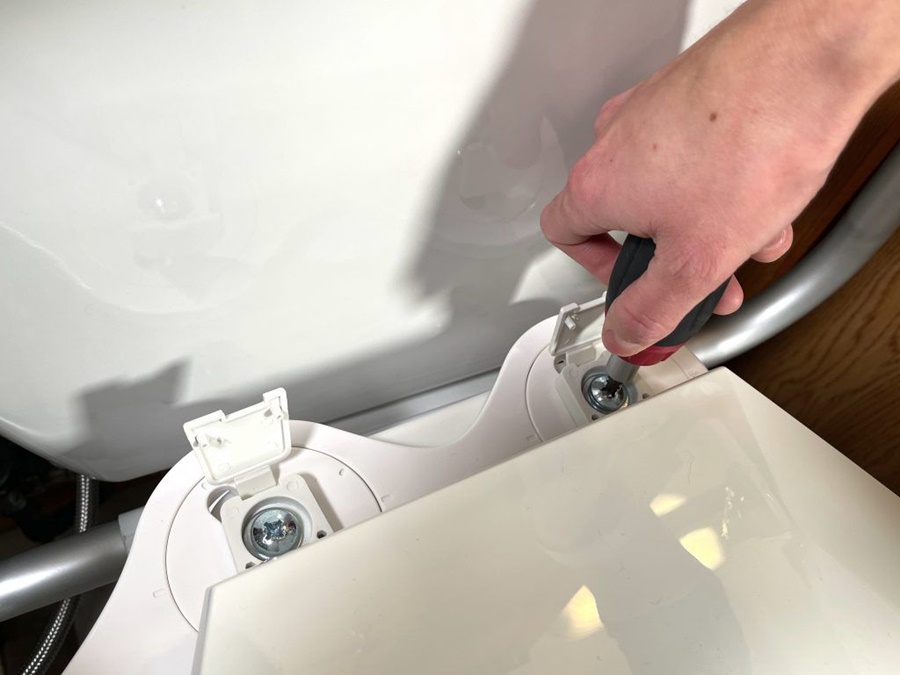
Step 3: Secure the Raised Seat
Insert the new bolts through the holes in the seat and toilet bowl.
Place washers and nuts underneath, and tighten with a wrench.
Be careful not to overtighten, as it can crack porcelain or damage plastic components.
Step 4: Install Armrests (If Applicable)
Slide the armrests into the designated slots on the seat.
Lock them into place following manufacturer instructions.
Test stability by applying gentle pressure on both sides.
Step 5: Test the Installation
Sit on the toilet seat carefully to check for movement.
Ensure the seat does not wobble or shift.
Re-tighten clamps or bolts as necessary.
Maintenance and Cleaning Tips
Clean the seat regularly with mild disinfectant and a damp cloth.
Avoid using harsh chemicals that may damage the material.
Check bolts and clamps weekly to ensure they remain secure.
Replace any worn or loose parts promptly to maintain safety.
Common Installation Mistakes to Avoid
Skipping measurements – choosing the wrong height or toilet shape leads to discomfort or improper fit.
Ignoring manufacturer instructions – always refer to the included manual for model-specific directions.
Overtightening bolts – can cause breakage and reduce product lifespan.
Not testing seat stability – always verify the seat is locked in place before use.
Safety Enhancements and Additional Features
Many raised toilet seats include non-slip surfaces, splash guards, or locking mechanisms. For users with significant mobility challenges, consider pairing the seat with:
Grab bars installed near the toilet
Toilet safety frames
Night lights for improved visibility
These additions provide an extra layer of support and independence.
When to Replace Your Raised Toilet Seat
Visible cracks or signs of wear
Persistent wobbling or instability
User outgrows the need after recovery
Newer models with better ergonomics or hygiene features become available
Regular inspection is key to ensuring the seat remains safe and functional over time.
Conclusion
Installing a raised toilet seat is a simple yet impactful upgrade that promotes comfort, safety, and independence in the bathroom. Whether for temporary recovery or long-term accessibility, choosing and properly installing the right seat makes a meaningful difference. Follow our detailed instructions and best practices to ensure a secure, stable setup tailored to your needs.