When caulk begins to crack, discolor, or peel away, it not only affects the appearance of your bathroom but can also allow water to seep behind the tub, leading to mold, mildew, and costly repairs. Recaulking a bathtub is a crucial maintenance task that restores the watertight seal and keeps your bathroom looking fresh and hygienic. Here, we provide a comprehensive, professional-level guide to help you learn how to recaulk a bathtub with perfect results every time.
Tools and Materials Needed to Recaulk a Bathtub
Before beginning, gather all necessary tools and materials. Using the right supplies ensures a smoother process and long-lasting results.
Essential Tools:
Utility knife or caulk removal tool
Razor scraper
Painter’s tape
Caulking gun
Caulk smoothing tool (or your finger)
Cleaning cloths
Spray bottle
Materials:
Silicone or tub-and-tile caulk (mold-resistant, waterproof)
Rubbing alcohol or mineral spirits
Mild detergent or bathroom cleaner
Bleach (for mold treatment)
Paper towels or rags
Latex gloves (optional)
Step 1: Remove Old Caulk Completely
Old caulk must be removed completely to allow proper adhesion of the new layer.
1. Slice through old caulk with a utility knife or specialized caulk remover tool. Take care not to scratch tiles or the tub surface.
2. Peel away the caulk strips, pulling slowly and evenly.
3. Use a razor scraper to eliminate any stubborn residue.
4. Clean the surface thoroughly with rubbing alcohol or mineral spirits to remove oils and mildew.
5. Inspect the area for mold. If you spot any, mix a solution of 1 part bleach to 10 parts water, spray the affected areas, wait 10 minutes, then rinse thoroughly.
Pro Tip: Be patient. Any residue left behind can compromise your seal later.
Step 2: Prepare the Tub for New Caulk
Preparation is key to a clean, professional finish.
1. Dry the area completely. Wait at least 24 hours if you cleaned with water.
2. Fill the bathtub with water. This simulates the natural expansion and contraction of the tub so the caulk doesn’t split later.
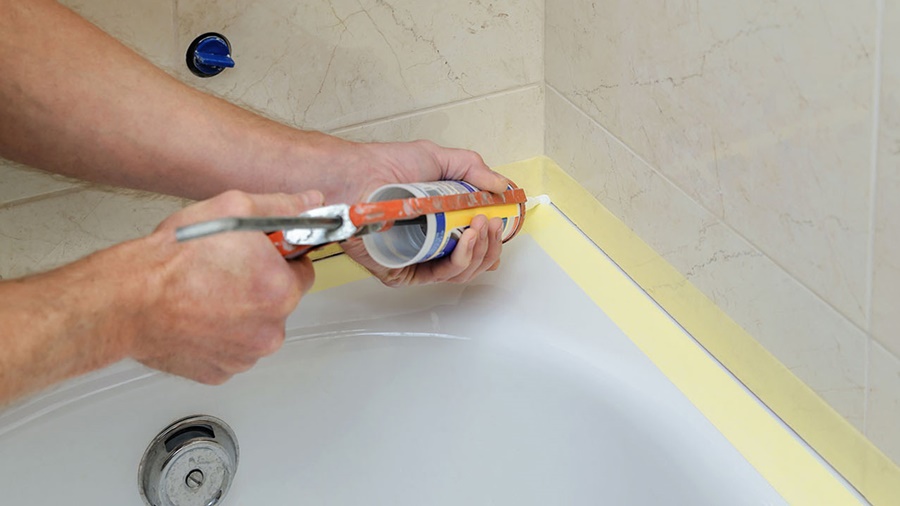
3. Apply painter’s tape to both sides of the joint where the caulk will be applied. This ensures a straight, clean edge.
Note: Choose a gap width that matches the original caulk line, usually between ⅛ inch to ¼ inch.
Step 3: Apply New Caulk
Now that the area is clean and prepped, it's time to apply the new bead of caulk.
1. Cut the tip of the caulk tube at a 45-degree angle to match the gap width.
2. Insert the tube into the caulking gun.
3. Apply steady pressure as you guide the gun along the seam. Try to use a continuous motion to avoid breaks or bubbles.
4. Smooth the bead with a caulk tool, spoon, or your finger dipped in water or rubbing alcohol.
5. Remove painter’s tape immediately before the caulk skins over, which typically happens within 5–10 minutes.
Pro Tip: Avoid applying too much caulk. A small, consistent bead is more durable and aesthetically pleasing.
Step 4: Allow Proper Curing Time
Curing is critical for a watertight seal. Don't rush this step.
Let the caulk cure undisturbed for at least 24 to 48 hours, depending on the manufacturer's instructions.
Keep the area dry and avoid using the tub during this period.
Ensure the bathroom is well ventilated to aid drying.
Avoid water contact or steam during curing, which can lead to premature failure.
Best Types of Caulk for Bathtubs
Choosing the right caulk makes all the difference in durability and resistance to mold.
Recommended Options:
100% Silicone Caulk: Best for high-moisture areas; offers superior flexibility and waterproofing.
Tub and Tile Caulk (Siliconized Latex): Easier to apply and clean, but less durable than pure silicone.
Important Features to Look For:
Mold and mildew resistance
Waterproof formula
Flexibility and adhesion
White or clear finish based on aesthetic preference
Avoid acrylic caulk in bathrooms it cracks easily under moisture and temperature fluctuations.
How Often Should You Recaulk a Bathtub?
Recaulking frequency depends on several factors such as use, ventilation, and caulk type.
Inspect caulk annually for signs of deterioration.
Recaulk every 3–5 years or when cracking, yellowing, or gaps appear.
Proper maintenance and periodic checks will help you avoid more serious repairs down the line.
Common Mistakes to Avoid When Recaulking
Learning what not to do is just as important.
Skipping surface cleaning: Leads to poor adhesion.
Applying caulk over old caulk: Causes peeling and gaps.
Using the wrong caulk type: Leads to premature failure.
Failing to let the caulk cure: Weakens the seal.
Not filling the tub: Causes stress cracks later.
Maintenance Tips for Long-Lasting Caulk
Keep your bathroom well-ventilated to prevent mildew.
Wipe down excess moisture after every use.
Use a mold-resistant bathroom cleaner regularly.
Inspect caulk lines periodically and address minor issues early.
Conclusion
Recaulking a bathtub is an essential task that protects your bathroom from water damage, mold, and deterioration. With the right tools, materials, and our step-by-step method, you can achieve a clean, durable finish that enhances both functionality and appearance. Don't wait until leaks or cracks become a problem act now and keep your bathroom in pristine condition.