When your bathtub drain becomes clogged, corroded, or simply outdated, knowing how to remove a bathtub drain yourself can save time, money, and frustration. With the right tools and method, you can complete this DIY task efficiently and prepare your tub for a new drain installation. Below is a comprehensive guide detailing everything you need to know.
Tools and Materials Required
Before diving into the process, gather the following tools:
Drain wrench (a.k.a. dumbbell tool)
Flathead screwdriver
Needle-nose pliers
Adjustable wrench
Hair clog remover or zip-it tool
Penetrating oil (like WD-40)
Plumber’s putty
Bucket and towels
Gloves and safety goggles
Step 1: Identify the Drain Type
Bathtub drains come in various styles. To effectively remove yours, you need to identify which type you're dealing with. The most common include:
Toe-touch drain
Lift-and-turn drain
Push-pull drain
Trip lever drain (uses a plunger located in the overflow tube)
Visual inspection will help determine the drain mechanism. Most modern tubs use the lift-and-turn or toe-touch systems.
Step 2: Remove the Stopper
Each type of stopper has a unique removal method:
Lift-and-Turn Stopper
1. Open the drain (lift position).
2. Hold the stopper’s body while unscrewing the top knob counterclockwise.
3. Use a screwdriver or wrench to remove the exposed set screw.
4. Lift out the entire stopper.
Toe-Touch Stopper
1. Press down to close the stopper.
2. Hold the shaft with pliers and rotate the cap counterclockwise.
3. Unscrew the shaft from the drain crossbar.
Push-Pull Stopper
1. Pull up the stopper.
2. Rotate the cap counterclockwise while holding the shaft.
3. Unscrew the assembly from the drain.
Trip Lever Stopper
1. Remove the overflow plate (two screws).
2. Pull out the linkage and plunger assembly.
3. With the stopper disconnected, the drain is now accessible.
Step 3: Clean Out Debris and Use Penetrating Oil
After the stopper is removed, clean the exposed drain:
1. Remove any hair or gunk using a zip-it tool or needle-nose pliers.
2. Apply penetrating oil around the drain flange to loosen rust or calcium buildup. Let it sit for 10–15 minutes.
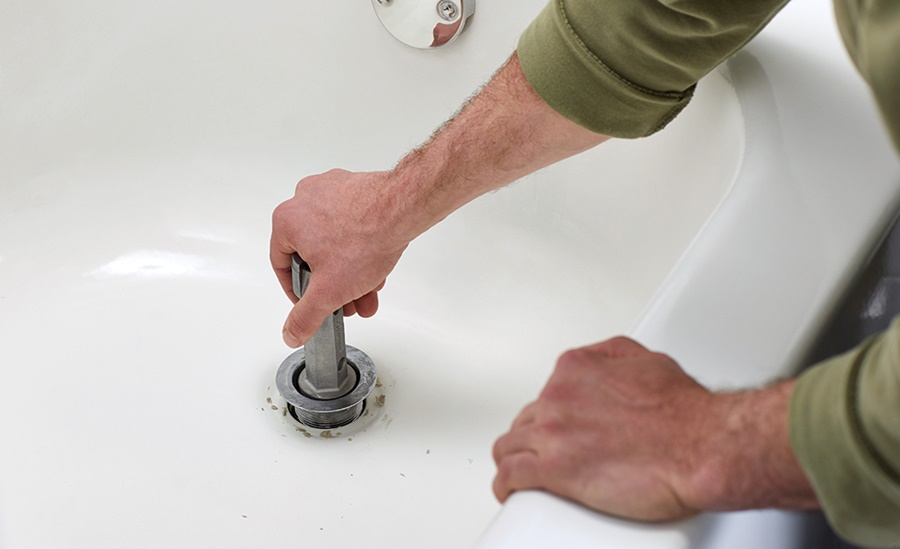
Step 4: Use a Drain Wrench or Dumbbell Tool
The drain flange is the threaded ring securing the drain to the tub. To remove it:
1. Insert the drain wrench into the crossbars inside the flange.
2. Use an adjustable wrench or screwdriver for torque.
3. Turn counterclockwise with steady pressure.
4. If stuck, apply more penetrating oil or use gentle heat with a hairdryer to loosen the metal.
Step 5: Alternative Methods for Difficult Drains
If the flange is stripped, corroded, or the crossbars are broken, try these options:
Use a Smart Dumbbell Tool
This dual-ended tool grips inside and around the flange for better torque.
Try Locking Pliers and a Hammer
Attach locking pliers tightly around the flange. Tap gently with a hammer to rotate counterclockwise.
Utilize a Drain Extractor Kit
Specifically designed for damaged drains, this kit removes stripped or broken parts without harming the tub surface.
Step 6: Remove and Clean the Drain Area
Once the flange is removed:
1. Lift it out of the hole.
2. Wipe away old plumber’s putty, rust, or debris using a scraper and rag.
3. Inspect the drain shoe for wear or corrosion. If damaged, replace it before installing a new drain.
Step 7: Optional — Remove the Drain Shoe
In some cases, you may need to remove the drain shoe (the elbow piece below the flange):
1. Access it through the overflow opening or below the tub if you have basement access.
2. Use a pipe wrench to unscrew it from the main drain line.
3. Be cautious not to damage adjoining pipes.
Step 8: Prepare for New Drain Installation
Before installing a new drain:
Roll fresh plumber’s putty into a rope and apply it under the new drain flange.
Insert the new flange into the shoe, tightening with a drain wrench.
Wipe away excess putty that oozes out.
Preventive Tips After Drain Removal
Inspect seals and pipes for leaks or corrosion.
Regularly clean the new drain to prevent future clogs.
Avoid chemical drain cleaners, which can degrade metal and PVC parts over time.
Common Mistakes to Avoid
Forcing parts without lubricant — this can strip or crack the flange.
Forgetting to use plumber’s putty — causes leaks over time.
Using the wrong tool — always match the tool to the drain type.
Skipping safety gear — gloves and goggles protect you from grime and sharp metal.
When to Call a Professional Plumber
If you encounter:
Severe rust or corrosion
Cracked or leaking drain lines
No access to the drain shoe
Plumbing unfamiliarity
it’s best to call a licensed plumber. Attempting repairs beyond your expertise can lead to more costly issues.
Conclusion
Learning how to remove a bathtub drain is an essential DIY skill that empowers you to maintain your bathroom’s functionality without expensive service calls. By following this step-by-step guide, you can safely and efficiently remove old or damaged drains and prepare your tub for an upgrade.