A leaky double-handle bathroom sink faucet isn’t just an annoyance it can lead to higher water bills, water damage, and mold growth if left unresolved. Fortunately, fixing it yourself is easier than you might think. In this comprehensive, step-by-step guide, we’ll show you exactly how to diagnose and repair a leak in your two-handle bathroom faucet like a pro. Whether it’s leaking from the spout or around the handles, we’ve got you covered.
Tools and Materials You'll Need
Before we begin, gather the following tools and materials:
Adjustable wrench
Phillips and flathead screwdrivers
Allen wrench (hex key)
Plumber’s grease
Replacement parts (O-rings, washers, cartridges, or valve seats depending on your faucet type)
Old toothbrush or nylon brush
White vinegar
Towel and bucket
Step 1: Shut Off the Water Supply
Before working on any plumbing fixture, turn off the water supply valves under the sink. Turn them clockwise until they’re fully closed. Then, open the faucet to release any remaining water and pressure from the lines.
Step 2: Plug the Drain and Lay a Towel
Use a sink stopper or a rag to block the drain to prevent small parts from falling into it. Place a towel over the sink to cushion tools and prevent scratches.
Step 3: Identify the Type of Faucet
Double-handle bathroom faucets typically fall into one of the following categories:
Compression faucet – uses rubber washers; most common in older homes.
Cartridge faucet – uses a cartridge for each handle; modern and more efficient.
Ceramic disc faucet – uses ceramic cylinders; known for durability.
The repair process varies based on the faucet type, so correctly identifying it is crucial.
Step 4: Remove the Faucet Handles
Use a flathead screwdriver to pry off the decorative caps on the handles (usually marked hot/cold). Underneath, you’ll see a screw. Use a Phillips screwdriver or Allen wrench to remove the screw, then gently pull the handle off.
Tip: If the handle is stuck due to mineral buildup, apply a bit of white vinegar around the base and wait a few minutes before trying again.
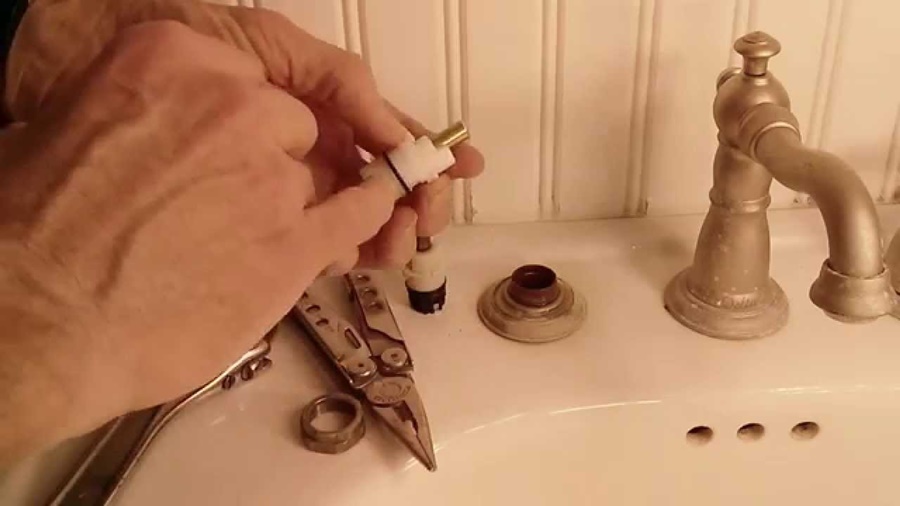
Step 5: Inspect and Remove the Valve Assembly
Once the handle is off, you'll see the packing nut. Use an adjustable wrench to unscrew the nut and pull out the valve stem or cartridge.
Depending on your faucet type:
Compression faucet: You’ll see a brass valve stem with a washer at the bottom.
Cartridge faucet: You’ll find a plastic or brass cartridge.
Ceramic disc faucet: You’ll find a ceramic cylinder unit.
Take the part with you to the hardware store if you're unsure what replacement to buy.
Step 6: Check and Replace Washers, O-Rings, and Cartridges
Most leaks stem from worn-out washers, O-rings, or cartridges. Here’s what to check:
For Compression Faucets:
Inspect the rubber washer at the bottom of the valve stem.
If it’s cracked, flattened, or hardened, replace it with an identical one.
Also, check the seat washer screw—replace it if it’s rusted or stripped.
For Cartridge Faucets:
Replace the entire cartridge if it’s stiff or damaged.
Lubricate the new cartridge lightly with plumber’s grease before installation.
For Ceramic Disc Faucets:
Remove and clean the ceramic disc with white vinegar if dirty.
Replace the cylinder if cracked or leaking.
Step 7: Clean the Valve Seat and Faucet Body
Use an old toothbrush or nylon brush to clean inside the faucet body and around the valve seat. For mineral deposits, soak a paper towel in white vinegar, place it on the area, and let it sit for 10–15 minutes.
Inspect the valve seat for signs of damage. If it’s pitted or cracked, use a seat wrench to remove and replace it.
Step 8: Reassemble the Faucet
Insert the repaired or replaced valve stem/cartridge back into the faucet body.
Tighten the packing nut securely but avoid over-tightening.
Reinstall the handle and screw.
Press the decorative cap back in place.
Repeat these steps for both handles if needed.
Step 9: Turn On the Water and Test
Slowly open the shutoff valves under the sink. Then, turn on both handles and observe for any leaks. If water flows smoothly without dripping from the spout or base, the job is done.
Bonus: Fixing a Leak at the Faucet Base
If water is pooling around the base of the faucet, the issue may lie with the O-rings around the spout. To fix this:
1. Loosen the set screw behind or beneath the spout.
2. Gently lift the spout off the faucet body.
3. Replace the O-rings with identical new ones.
4. Apply a thin coat of plumber’s grease to the new O-rings.
5. Reassemble and test.
Prevent Future Leaks
Avoid overtightening handles this wears out washers prematurely.
Clean aerators regularly to prevent pressure buildup.
Check under the sink periodically for moisture or signs of leakage.
When to Call a Professional
If your faucet is still leaking after replacing washers, cartridges, or O-rings or if the faucet body itself is cracked it may be time to call a licensed plumber or consider replacing the entire unit.
Conclusion
Fixing a leaky double-handle bathroom sink faucet is a task well within the capabilities of most homeowners. By following the steps above, you can eliminate leaks, save money, and extend the life of your plumbing fixture. Use quality replacement parts, take your time, and your faucet will function like new.