When planning a bathroom renovation or replacing an existing sink, accurate bathroom sink measurements are essential. Whether you're selecting a drop-in, undermount, pedestal, vessel, or wall-mounted sink, precise dimensions will ensure compatibility with your vanity, plumbing, and countertop. In this guide, we will walk you through how to measure a bathroom sink correctly and thoroughly, using professional standards to avoid costly mistakes.
Understanding the Types of Bathroom Sinks
Before you begin measuring, it’s important to identify the type of sink you’re working with:
Drop-In Sinks (Top Mount): Rest on the countertop with a rim visible.
Undermount Sinks: Installed under the countertop for a seamless look.
Vessel Sinks: Sit above the counter, like a bowl.
Pedestal Sinks: Stand alone, not on a vanity.
Wall-Mounted Sinks: Attached directly to the wall with no cabinetry.
Each type requires a different measuring method, and choosing the correct replacement depends heavily on getting these measurements right.
Tools You’ll Need
To achieve the most precise bathroom sink measurements, gather the following tools:
Measuring tape (preferably metal for rigidity)
Pencil and notepad
Level (for wall-mounted and pedestal sinks)
Flashlight (for hard-to-see plumbing or under-cabinet areas)
Helper (optional, for large or awkward sinks)
Step-by-Step: How to Measure a Bathroom Sink
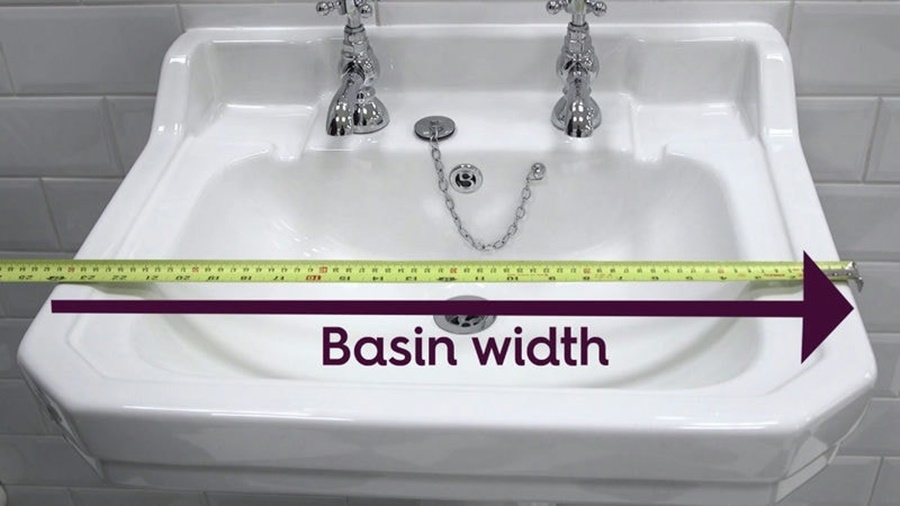
1. Measure Sink Width (Side to Side)
Width refers to the measurement from the left edge to the right edge of the sink:
For drop-in or undermount sinks, measure from outer edge to outer edge at the widest point.
For vessel sinks, measure the widest part of the bowl.
Wall-mounted and pedestal sinks follow the same process.
Pro Tip: Always double-check by measuring both front and back widths to ensure consistency some sinks are not perfectly symmetrical.
2. Measure Sink Depth (Front to Back)
Depth, in this context, refers to the distance from the front of the sink to the back:
Place the tape at the farthest point in the front and stretch it to the farthest back edge.
For undermount sinks, take the measurement from under the countertop edge.
For vessel sinks, measure the base diameter if the sink is round or square.
Ensure you're not including backsplash or overhangs unless they're part of the sink.
3. Measure Sink Basin Depth (Top to Bottom)
This is the vertical depth of the bowl how deep the sink holds water:
Insert the tape measure inside the bowl, from the bottom (drain level) to the top edge.
If it’s an undermount or vessel sink, make sure to account for the visible portion only.
This measurement is essential for determining how much water the sink can hold and avoiding overflow issues.
4. Measure Faucet Hole Spacing
Most bathroom sinks have pre-drilled holes for faucets:
Identify the center-to-center distance between each faucet hole (typically 4", 8", or single-hole).
Also, measure the diameter of each hole.
For widespread faucets, the distance between outer holes can vary; measure accordingly.
This will help ensure your faucet set fits your new or existing sink.
5. Measure Cutout Size (For Drop-in or Undermount Sinks)
If you’re replacing a drop-in or undermount sink:
Remove the sink or measure from underneath the countertop.
Record the cutout width and depth (the hole in the countertop).
Always measure the inner edge of the cutout, not the sink rim.
A mismatch in cutout size can cause the sink to be unstable or improperly installed.
6. Account for Sink Rim (Drop-In Sinks)
For top-mount sinks, the rim sits on the counter. You must account for:
Rim width (usually ½ inch to 1 inch on each side)
Overall size including the rim
This ensures the sink doesn’t overhang or underlap the cutout inappropriately.
7. Measure Bathroom Vanity Space (If Applicable)
When replacing a sink set into a vanity:
Measure the total vanity width and depth.
Determine the available sink area, subtracting space needed for faucets and counter edges.
Ensure the new sink does not exceed available dimensions.
Note: Many modern vanities are custom-fitted, so precision is key here.
8. Plumbing and Clearance Measurements
You’ll also need to measure around the sink for:
Drain location (centered or offset)
Distance from wall to drain
Height from floor to drain and water lines
Clearance around the sink for faucet handles or soap dispensers
Taking these into account ensures the sink not only fits physically, but also functionally.
9. Special Considerations for Pedestal and Wall-Mounted Sinks
For pedestal sinks:
Measure the width and depth of the basin.
Measure the height from floor to top of the pedestal.
Consider base width for floor clearance.
For wall-mounted sinks:
Measure mounting bracket distance.
Determine height from floor to desired sink top (usually 32–36 inches).
Check wall stud placement for secure installation.
Measurement Chart Template (Sample)
| Measurement Area | Dimension (in inches) |
|---|---|
| Sink Width | 20" |
| Sink Depth | 17" |
| Basin Depth | 6.5" |
| Faucet Hole Spacing | 4" (center set) |
| Cutout Width | 18.5" |
| Cutout Depth | 15.5" |
| Rim Width | 0.75" |
| Vanity Top Width | 24" |
| Vanity Top Depth | 18" |
Tips for Buying a New Bathroom Sink Based on Measurements
Always take current sink measurements before shopping.
Bring measurements and photos when visiting showrooms.
Check for compatibility with faucets—don't assume standard fittings.
When in doubt, consult a plumber or installer with your measurements for advice.

Why Accurate Bathroom Sink Measurements Matter
Measuring a bathroom sink accurately can save time, money, and hassle. Whether it's ensuring plumbing lines match, a countertop fits snugly, or your faucet set installs correctly, precision is non-negotiable.
A poorly fitted sink can cause leaks, instability, and even water damage over time. Take the extra few minutes to double-check every dimension before making a purchase or scheduling an installation.
Worth reading alongside this: standard bathroom vanity sizes.
Worth reading alongside this: standard bathroom vanity sizes.
We cover remodel bathroom for optimal efficiency in more depth separately.
Conclusion
Properly measuring a bathroom sink is a straightforward yet essential task. By carefully documenting the width, depth, basin depth, faucet hole spacing, and cutout size, you’ll avoid the frustration of returns or modifications. Whether you’re upgrading to a modern vessel sink or replacing an old drop-in model, these steps will ensure a smooth installation.