The water level in your toilet tank plays a crucial role in how efficiently and effectively your toilet flushes. If the water level is too low, it may result in weak flushes. If it's too high, the tank could overflow or run constantly, wasting water. Fortunately, adjusting the water level is a simple DIY task that requires minimal tools.
Here's a comprehensive guide to help you get it done.
Why Adjusting the Water Level Matters
Before diving into the how-to, it’s good to know why this matters:
Efficient flushing: Ensures a proper flush every time.
Water conservation: Helps reduce water waste and your utility bill.
Prevent overflows and leaks: Avoids potential water damage or a constantly running t
Tools You Might Need
Flathead screwdriver (if needed for adjustment)
Sponge or towel (to clean up spills)
Rubber gloves (optional, for cleanliness)
Step 1: Remove the Tank Lid
Start by carefully removing the lid from the toilet tank. Set it aside on a flat surface to avoid any accidental damage. Be gentle—these lids are often ceramic and can break easily.
Step 2: Check the Water Level
Most toilet tanks have a marked line inside showing the ideal water level. This line is usually about 1 inch below the top of the overflow tube. If there’s no line, aim for that 1-inch mark.
Compare the current water level to the ideal level:
Too high? You’ll need to lower it.
Too low? You’ll need to raise it.
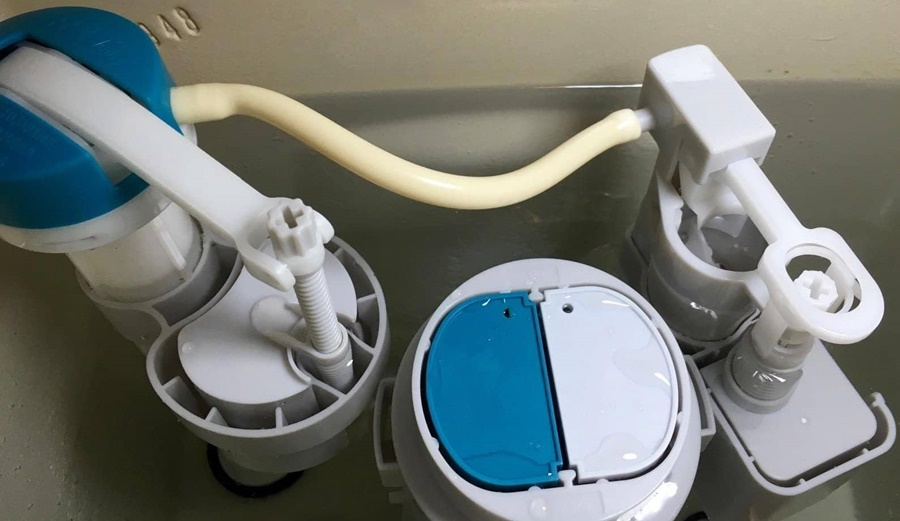
Step 3: Identify Your Fill Valve Type
There are two common types of fill valves in toilet tanks:
1. Float Cup (or Cylinder Float)
Found in newer toilets.
A cylindrical float moves up and down the fill valve shaft.
2. Float Ball (or Ballcock)
Found in older toilets.
A large plastic ball attached to a metal or plastic arm.
Each type adjusts differently.
Step 4: Adjust the Water Level
For Float Cup Valves:
1. Look for the adjustment screw on top of the fill valve.
2. Use a screwdriver to turn the screw clockwise to raise the water level or counterclockwise to lower it.
3. Flush the toilet to see the new level. Repeat as needed.
For Float Ball Valves:
1. Locate the adjustment screw on the arm connecting the float ball.
2. Turn the screw:
Clockwise to lower the water level.
Counterclockwise to raise it.
1. Alternatively, gently bend the metal arm downward or upward (only if it’s metal, not plastic).
Step 5: Test Your Adjustment
Once you've made adjustments, flush the toilet and observe:
Does the water stop at the correct level?
Is the float sitting properly?
Is the fill valve shutting off at the right time?
If not, fine-tune the adjustment until it's just right.
Step 6: Replace the Tank Lid
When the water level is where it should be, replace the tank lid carefully. You're done!
Troubleshooting Tips
Water won’t stop running? Check that the flapper is sealing properly and the float isn’t stuck.
No change in water level? The fill valve might be faulty and may need to be replaced.
Constant overflow into the tube? Lower the float level further.
Common Mistakes to Avoid
One frequent error is setting the water level too high. This can lead to constant water flow into the overflow tube, which wastes water and increases your bill. Ensure the water level stays below the overflow tube's opening.
Another mistake is not securing the adjustment properly. If you've adjusted the float but didn’t tighten the arm or lock nut, the float could shift during operation. Always double-check and ensure everything is tightened before putting the lid back.
Lastly, don’t forget to test the toilet after making adjustments before walking away. A simple test flush can save you from future frustrations. If you skip this step, you might end up with an improperly functioning toilet.
Maintenance Tips for Optimal Functionality
Regular maintenance can prevent issues related to water levels. Periodically check the toilet tank for leaks or corrosion. Signs such as water stains around the base of the toilet could indicate underlying problems.
Cleaning the fill valve occasionally helps maintain proper function. Mineral buildup can impede operation, leading to slow filling or water level discrepancies. Use a cloth to wipe the valve and flush it all with vinegar to break down mineral deposits.
Finally, consider replacing old parts proactively. If you notice that adjusting the float doesn’t work as it used to, it may be time for a fill valve replacement. Investing in new parts can often lead to greater efficiency and save you money on your water bill.

Cost Comparison of Different Fill Valve Types
When it comes to adjusting the water level, the type of fill valve affects both your approach and costs. A float ball system may cost less, often ranging from $10 to $20. However, they can be prone to wear over time, leading to more frequent replacements.
On the other hand, a float cup valve might cost slightly more—between $15 and $30—but they tend to offer better reliability. While you spend a little extra upfront, it may save you more money in the long run due to their durability.
When choosing, consider how much you use the toilet and the likelihood of needing repairs in the future. If your toilet sees heavy daily use, investing in a sturdier float cup technology could yield significant long-term savings.
If that matters to you, our piece on tank vs tankless water heater goes further.
Conclusion
Adjusting your toilet’s water level is a quick and easy fix that can save water, prevent plumbing issues, and ensure your toilet functions properly. With just a few minutes of work, you’ll have everything running smoothly again. If you're also interested in checking for leaks, that can further enhance water conservation efforts.