When the toilet tank has no water, it’s more than an inconvenience it’s a clear signal that something is wrong in your plumbing system. Whether you’re a homeowner, landlord, or tenant, understanding how to fix no water in the toilet tank is essential to restore full functionality to your bathroom quickly and effectively.
Below, we offer an in-depth, actionable guide with expert-level insights into troubleshooting and repairing this common yet critical issue.
1. Understanding How a Toilet Tank Works
Before troubleshooting, it's crucial to understand the basic mechanics of a toilet tank:
Water supply line: Connects the home’s water system to the toilet.
Shut-off valve: Controls the flow of water into the toilet.
Fill valve: Refills the tank after each flush.
Float mechanism: Regulates when the water stops filling.
Flush valve and flapper: Releases water into the bowl during a flush.
When water isn’t entering the tank, one or more of these components may be faulty.
2. Check the Shut-Off Valve
The shut-off valve is the first component to inspect. Located near the base of the toilet, it’s often bumped during cleaning or maintenance.
Steps to inspect and fix the shut-off valve:
1. Locate the valve on the wall behind or beside the toilet.
2. Ensure it’s turned counterclockwise to the full "open" position.
3. If it's stuck or won’t turn, apply WD-40 and gently loosen it using a wrench.
4. After opening, listen for water flow. If none, proceed to the next step.
3. Inspect the Water Supply Line
A blocked, kinked, or leaking supply line could prevent water from reaching the tank.
What to do:
Turn off the shut-off valve.
Disconnect the water line from the base of the toilet (use a wrench and bucket to catch drips).
Check for visible kinks, corrosion, or clogs.
Flush the line by briefly turning the valve on and off to check water flow.
Replace the line if it shows signs of wear or if no water comes through.
4. Examine the Fill Valve
The fill valve, located inside the tank, controls the water refill. If this component fails, the tank won't fill.
Steps to test and repair:
1. Remove the tank lid and observe the fill valve operation while attempting a flush.
2. If the valve makes no sound and no water enters, it may be faulty or clogged.
3. Shut off the water and disconnect the water line.
4. Remove the fill valve and inspect the inlet screen for debris.
5. Clean or replace the valve. Universal fill valves are affordable and easy to install.
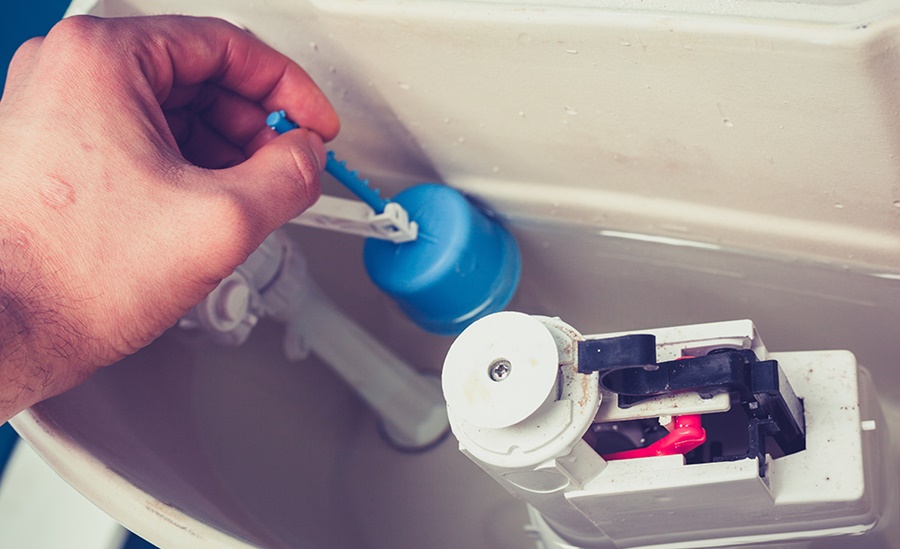
5. Adjust or Replace the Float Mechanism
An improperly set float mechanism can signal the fill valve to stop before water fills the tank.
To adjust the float:
For a ball float (older style), bend the float arm gently downward to allow more water.
For a cup float (newer models), slide the clip up or down along the rod to adjust the water level.
If adjusting doesn’t fix the issue, replace the float mechanism with a compatible model.
6. Clear Clogged Inlet Holes
Sometimes mineral buildup from hard water can clog the inlet holes inside the tank.
Cleaning instructions:
1. Turn off the water and flush to empty the tank.
2. Use a wire brush or toothpick to clear any sediment or calcium deposits around the inlet.
3. Use white vinegar or CLR (Calcium, Lime, Rust remover) to dissolve stubborn buildup.
4. Restore water flow and observe for improvements.
7. Check the Flush Valve and Flapper
If water enters the tank but drains immediately, a leaky flapper or faulty flush valve might be the cause.
To inspect and fix:
Ensure the flapper sits tightly over the flush valve seat.
If it’s warped, cracked, or deteriorated, replace it.
Check that the chain is not too tight or too loose, which can prevent a good seal.
Replace the flush valve if leaks persist even after changing the flapper.
8. Inspect for Low Water Pressure
In some cases, low household water pressure could be the culprit. This affects how fast and how much water fills the tank.
What to do:
Test pressure at other fixtures like sinks or showers.
If low across the house, contact your water provider or a plumber.
If localized to the toilet, clean the supply line and check for clogs or valve obstructions.
9. Consider Installing a New Toilet Fill Kit
If your toilet has multiple aging components, replacing them with a complete toilet fill kit may be the most efficient solution.
Benefits:
Modern fill kits are water-efficient, durable, and quiet.
Installation takes less than an hour with basic tools.
Solves multiple potential failure points in one upgrade.
10. When to Call a Professional Plumber
If all else fails, or if the main water supply seems affected, it may be time to contact a licensed plumber. Complex issues such as:
Internal pipe blockages
Broken valves inside the wall
Significant corrosion in plumbing lines
Require professional tools and experience to resolve safely and thoroughly.
There is more on tank vs tankless water heater elsewhere on the site.
Conclusion
Dealing with no water in the toilet tank may seem frustrating at first, but with a clear, step-by-step approach, the problem is often easier to resolve than expected. By systematically checking the shut-off valve, water supply line, fill valve, float mechanism, and flush components, you can identify and fix the issue without needing to call a plumber in most cases.
Regular maintenance, quick attention to minor malfunctions, and replacing worn-out parts when necessary can prevent this problem from recurring. Staying proactive not only ensures your toilet functions properly but also helps avoid larger plumbing issues down the road. For additional assistance, learn more about how to fix no water in toilet tank.