Organizing the space under your bathroom sink can be challenging due to limited room, awkward plumbing, and various-sized items. However, a well-organized bathroom cabinet maximizes storage, improves hygiene, and simplifies your daily routine. Below, we break down a comprehensive, step-by-step strategy to declutter and organize under your bathroom sink effectively.
1. Clear Everything Out and Clean Thoroughly
Start by completely emptying the cabinet. This will help assess what you have and make room for a new, structured setup. Toss out expired products, empty containers, or duplicates you no longer use. Then, wipe down the interior, including corners and pipes, using an antibacterial cleaner. If you spot mildew or water damage, now’s the time to address it before adding organizers.
2. Categorize Your Bathroom Items
Grouping items into categories allows for better accessibility and less mess. Use the following categories to sort:
Daily essentials: toothpaste, deodorant, face wash
Hair products: shampoo, conditioner, styling tools
Skin care: moisturizers, masks, serums
First aid: band-aids, antiseptic, ointments
Cleaning supplies: sponges, sprays, gloves
Extras: backup toiletries, travel-size products
Labeling each group not only brings order but ensures everything has a designated spot.
3. Measure the Space Before Buying Organizers
Take exact measurements of the height, width, and depth of your under-sink space. Be mindful of the pipes and garbage disposal units if present. With accurate measurements, you can choose custom-fit storage solutions that maximize every inch.
4. Use Stackable Bins and Clear Drawers
Stackable plastic bins or clear acrylic drawers are ideal for vertical storage. Choose bins with handles for easy access. Label each bin by category for a polished, efficient system.
Benefits of clear storage bins:
Easy to see contents
Stackable design saves space
Resistant to moisture
Place frequently used items in the front or top bins for convenience.
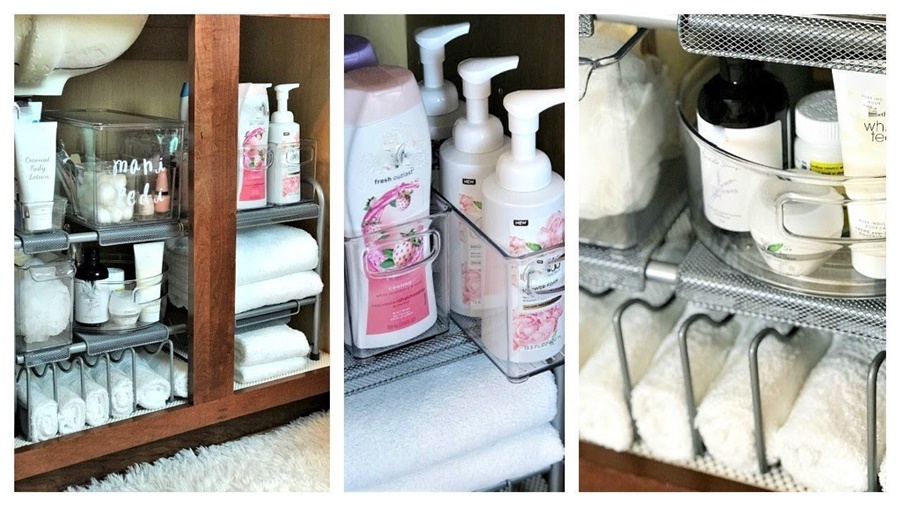
5. Install a Two-Tier Sliding Organizer
A two-tier sliding organizer makes the most of vertical space and provides easy access to items at the back. These slide-out trays typically fit around plumbing and are great for storing taller bottles like mouthwash or hair sprays.
Opt for units with adjustable shelves or modular features that can adapt to your changing storage needs over time.
6. Use Turntables (Lazy Susans) for Easy Access
Turntables are perfect for deep cabinets or hard-to-reach corners. Use them to store smaller products like skincare, medicine, or grooming tools. The 360-degree rotation ensures you can grab what you need without knocking over other items.
Tip: Use turntables with high walls or ridges to keep products from falling during rotation.
7. Add a Tension Rod for Hanging Items
Install a tension rod across the top of the cabinet to hang spray bottles. This not only frees up shelf space but also prevents chemical leakage from bottles tipping over.
You can also use S-hooks on the rod to hang:
Cleaning gloves
Small baskets
Hair tools with loops
8. Incorporate Drawer Dividers or Small Baskets
For cabinets with built-in drawers, use adjustable dividers to create designated spaces for small items. Alternatively, small plastic or woven baskets help keep products grouped neatly.
These are excellent for:
Cotton swabs and pads
Nail clippers and tweezers
Contact lens supplies
Essential oils
9. Utilize the Cabinet Door for Extra Storage
Don’t waste vertical door space. Use adhesive hooks, magnetic strips, or over-the-door organizers for:
Hair dryers or flat irons
Toothbrush holders
Hanging mini bins for cosmetics
Clip-on file holders for storing instruction manuals or masks
Self-adhesive organizers are renter-friendly and easy to reposition.
10. Store Backstock in Bins at the Back
Keep backup items like toothpaste, soap, razors, or feminine hygiene products in clearly labeled storage bins at the back of the cabinet. Since these aren’t needed daily, it’s fine to store them deeper in the cabinet.
Labeling tip: Use waterproof labels or chalkboard labels for easy updating.
11. Opt for Moisture-Resistant Materials
Bathrooms are prone to humidity. Ensure all storage solutions are moisture-resistant or waterproof. Materials like:
Plastic
Acrylic
Metal with a rust-proof coating
are ideal choices that won’t warp, mildew, or degrade over time.
12. Keep Only What You Use Regularly
A common cause of under-sink clutter is hoarding products "just in case." Commit to only keeping what you truly use. Rotate products regularly, and check expiry dates every few months.
Minimalism keeps the space functional, not overloaded.
13. Label Everything for Long-Term Order
Consistency is key. Use uniform labeling for bins, drawers, and containers. Whether printed, handwritten, or made with a label maker, labels promote accountability and ease of use for everyone in the household.
14. Maintain with a Monthly Check-In
Set a calendar reminder to check your bathroom storage monthly. Look for spills, expired items, or clutter creep. A 10-minute cleanup session can prevent future overhauls and maintain the system you worked hard to create.
15. Bonus Ideas for Small Bathrooms
If you're working with an especially small bathroom or pedestal sink, here are a few additional tips:
Rolling carts beside the sink
Floating shelves above or around the sink
Over-the-toilet storage cabinets
Wall-mounted baskets for daily items
Magnetic strips inside cabinet doors for bobby pins or tweezers
Conclusion
Transforming the cluttered, chaotic space under your bathroom sink into a streamlined storage area is not just possible it’s easy with the right approach. By using custom storage solutions, maintaining organizational systems, and committing to regular upkeep, you can turn that forgotten space into a functional, tidy asset to your home.