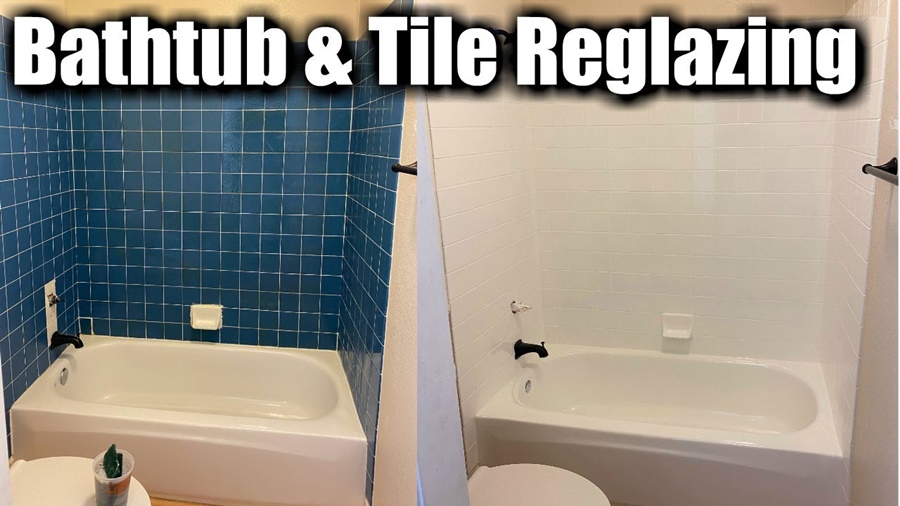
Reglazing a bathtub is a cost-effective and efficient solution to revive an old, worn, or stained tub without the need for a full replacement. In this comprehensive guide, we walk through everything from preparation to finishing, ensuring a professional-grade result you can achieve on your own.
What is Bathtub Reglazing?
Bathtub reglazing, also known as refinishing or resurfacing, is the process of restoring the surface of a bathtub by applying a new coating. Over time, bathtubs develop chips, scratches, stains, and general wear. Reglazing returns the tub’s surface to a like-new condition, extending its life for many more years.
Tools and Materials Needed for Reglazing
Before beginning, gather the following tools and materials:
Safety goggles and gloves
Respirator mask (for fumes)
Painter’s tape and plastic sheeting
Screwdriver
Putty knife
Caulk remover
Fine sandpaper (220 to 400 grit) or abrasive pad
Etching powder or acid (for porcelain/ceramic tubs)
Epoxy filler (for chips or cracks)
Tack cloth
Cleaning solution (trisodium phosphate recommended)
Tub reglazing kit (includes primer, bonding agent, topcoat)
Paint sprayer or foam roller
Step 1: Prepare the Bathroom for Reglazing
Ventilation and Protection are Critical
Open windows and use exhaust fans to ensure proper ventilation.
Use plastic sheeting and painter’s tape to cover tiles, walls, faucets, and floors.
Remove all caulking around the tub’s edges with a caulk remover tool.
Detach the drain cover and overflow plate with a screwdriver.
Creating a dust-free and clean work zone is vital to a smooth reglazing finish.
Step 2: Deep Clean the Bathtub Surface
A Clean Surface Equals Better Adhesion
Scrub the tub thoroughly using trisodium phosphate (TSP) to remove soap scum, oils, and mineral deposits.
Rinse well and dry the surface completely.
Use fine-grit sandpaper or an abrasive pad to sand the entire surface. This helps roughen the finish for better coating adhesion.
Clean again using a tack cloth to remove all dust particles.
This step ensures that the reglazing material will adhere properly and last longer.
Step 3: Repair Chips and Cracks
Don’t Skip Surface Repairs
Use a high-quality epoxy filler to repair any scratches, chips, or cracks.
Apply with a putty knife and smooth it flush with the tub surface.
Let it dry completely as per manufacturer instructions, then sand smooth.
This step guarantees a seamless, flawless final appearance after reglazing.
Step 4: Etch the Surface (If Necessary)
Etching Helps the Coating Bond Better
For porcelain or ceramic tubs, apply etching powder or acid as directed in the kit.
Rinse thoroughly and dry.
The etching process microscopically roughens the surface, allowing strong chemical bonding between the old surface and the new finish.
Step 5: Apply the Bonding Agent and Primer
Creating a Strong Base for the Topcoat
Apply the bonding agent using a sprayer or foam brush, depending on the kit instructions.
Let it sit for the required time (usually around 15 minutes).
Next, apply the primer coat evenly. This primes the surface for the final reglaze layer.
Let the primer dry thoroughly before moving to the final step.
Step 6: Apply the Topcoat
This is Where the Transformation Happens
Mix the topcoat enamel or epoxy as instructed.
Apply using a high-quality sprayer for best results. Foam rollers can work too, but may leave a slightly textured finish.
Apply 2 to 3 even coats, allowing sufficient drying time between each coat.
Maintain even strokes and proper ventilation to avoid bubbles and imperfections.
Step 7: Curing and Finishing Touches
Allow the Tub to Cure Fully
Let the reglazed tub cure for at least 48 to 72 hours. Do not use the tub during this time.
After curing, re-caulk the tub’s edges using a mold-resistant silicone caulk.
Reattach all fixtures, including the overflow plate and drain cover.
Your bathtub should now have a gleaming, glossy finish that looks brand new.
Maintenance Tips for Reglazed Bathtubs
To extend the life of your reglazed tub:
Avoid abrasive cleaners use mild, non-acidic products only.
Do not place suction-cup bath mats on the surface.
Clean regularly with a soft sponge or microfiber cloth.
Prevent standing water from lingering for long periods.
With proper care, a reglazed bathtub can last 10 to 15 years before needing another refresh.
When Should You Reglaze Instead of Replace?
Choose to reglaze if:
Your tub is in good structural condition, but cosmetically worn.
You want to save on remodeling costs.
You’re aiming for a quick bathroom upgrade before selling a home.
The tub is made of cast iron, porcelain, or fiberglass.
However, replacement may be necessary if the tub has severe structural damage or you're redesigning your bathroom entirely.
Professional Reglazing vs DIY Reglazing
DIY Reglazing can save hundreds of dollars, but results vary based on:
Surface preparation
Product quality
Application technique
Professional reglazing services often offer a more durable finish with warranties, but can cost between $300 and $800.
If you're confident in your skills and follow steps meticulously, DIY reglazing is a rewarding and budget-friendly alternative.
Cost of Bathtub Reglazing
The cost of DIY reglazing ranges from $50 to $150, depending on the kit quality and tools you already own. Professional reglazing averages $400, depending on your location and tub material.
Compared to full replacement costs that range from $1,500 to $5,000, reglazing is significantly more affordable.
Conclusion
Absolutely. Reglazing is a fast, cost-efficient way to revitalize your bathroom, add property value, and improve daily comfort. With proper preparation, attention to detail, and care, your reglazed tub can remain pristine for over a decade.